
That small water stain on a ceiling tile in the conference room. The drip that showed up in the warehouse during the last heavy rain. For a Washington business owner or property manager, those signs are easy to push down the list for a week or two. Then the next storm hits, and a minor issue starts affecting tenants, equipment, or daily operations.
That’s why a commercial roof inspection checklist matters. It gives building owners a practical way to catch problems before they become disruptive leaks, interior damage, or emergency repairs. In Western Washington, where long wet stretches can hide roof problems until water shows up inside, routine inspections aren’t just maintenance. They’re part of protecting the whole property.
Industry guidance commonly recommends inspecting commercial roofs at least twice a year, usually in spring and fall, and again after severe weather or roof access by vendors or contractors, because many failures only become obvious when someone checks on a schedule, as outlined in this commercial roof inspection checklist guide. For owners trying to budget ahead, that routine creates a record of what’s changing and what needs attention next.
For readers also comparing upkeep costs around the property exterior, this overview of Marietta tree removal cost may be useful when overhanging trees are adding debris and shade to a roof.
A commercial roof inspection checklist should cover the roof surface, drainage, flashing, penetrations, edges, seams, rooftop equipment, and interior signs of moisture. The best checklist also documents photos, weather conditions, and exact problem areas so owners can tell what needs immediate repair, what can be monitored, and what should go into the maintenance budget.
Commercial Roof Inspection Checklist for Business Owners
1. Shingle and Surface Material Condition Assessment
The surface tells the first part of the story. On a commercial roof, that may mean composition shingles on a sloped section, metal panels over part of the structure, or a membrane roof over the main footprint. If the outer layer is aging, damaged, or heavily patched, the whole building is more vulnerable to leaks.
In Western Washington, surface wear often shows up differently on each side of the roof. North-facing slopes tend to stay damp longer. Roof areas under trees in places like Redmond or Sammamish often hold moss and debris longer than open, sunnier sections. That uneven exposure matters because one roof can age at different rates across the same building.
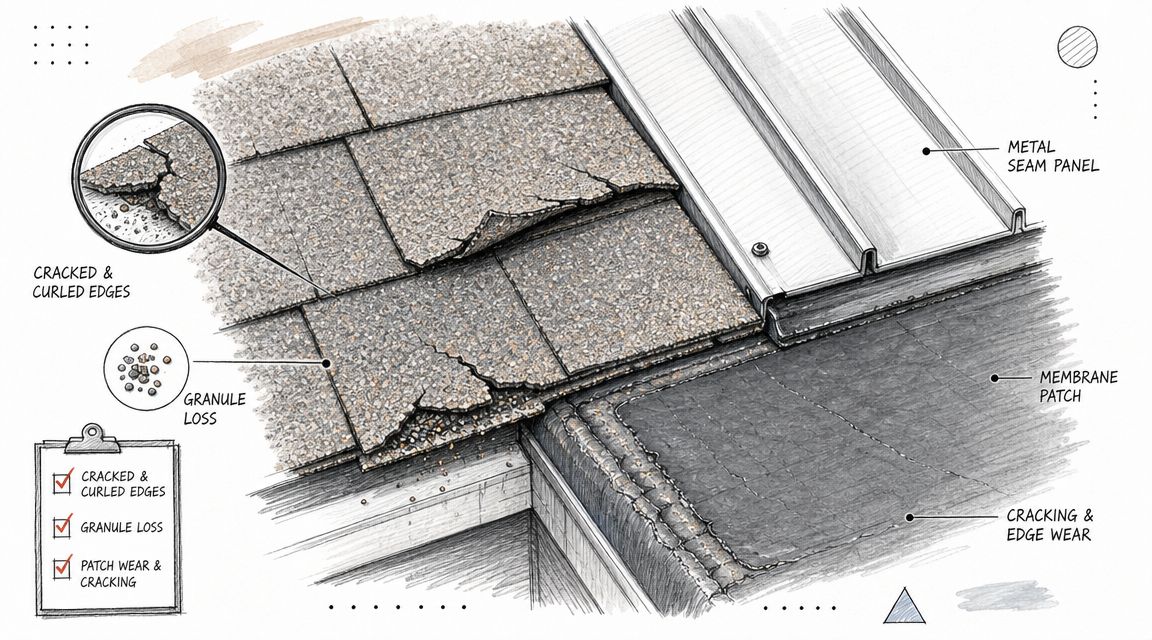
What to check on the roof surface
A useful inspection doesn’t stop at “looks worn.” It records what material is installed, where visible wear appears, and whether the damage is isolated or spread across the roof.
- Identify the roof type: Note whether the building has composition shingles, standing seam metal, tile, or a membrane roof. That affects what wear patterns matter most.
- Look for visible deterioration: Check for cracked shingles, exposed metal, worn protective surfaces, punctures, patchwork, and areas that stay wet.
- Compare sections of the roof: One slope may be in much better shape than another. That helps separate localized trouble from overall aging.
- Document dates if known: Installation year and repair history help when reviewing warranties or planning replacement timing.
For owners unsure how material type changes maintenance needs, this guide to roofing materials comparison gives helpful context.
Practical rule: If one section of the roof has been patched repeatedly, it may no longer be a small repair issue. It may be a sign the surrounding system is starting to fail.
A roof surface review works best when it includes photos from the same spots each time. That simple habit makes year-to-year changes easier to spot and gives owners a clearer basis for maintenance decisions.
2. Flashing and Penetration Integrity
Many roof leaks don’t start in the middle of the roof. They start where something interrupts it. Vents, skylights, HVAC curbs, wall transitions, and edge details all create openings or seams that rely on flashing and sealant to keep water out.
That’s why flashing deserves its own line item on any commercial roof inspection checklist. Even a small failure around a vent or rooftop unit can let water work below the surface before anyone notices inside.
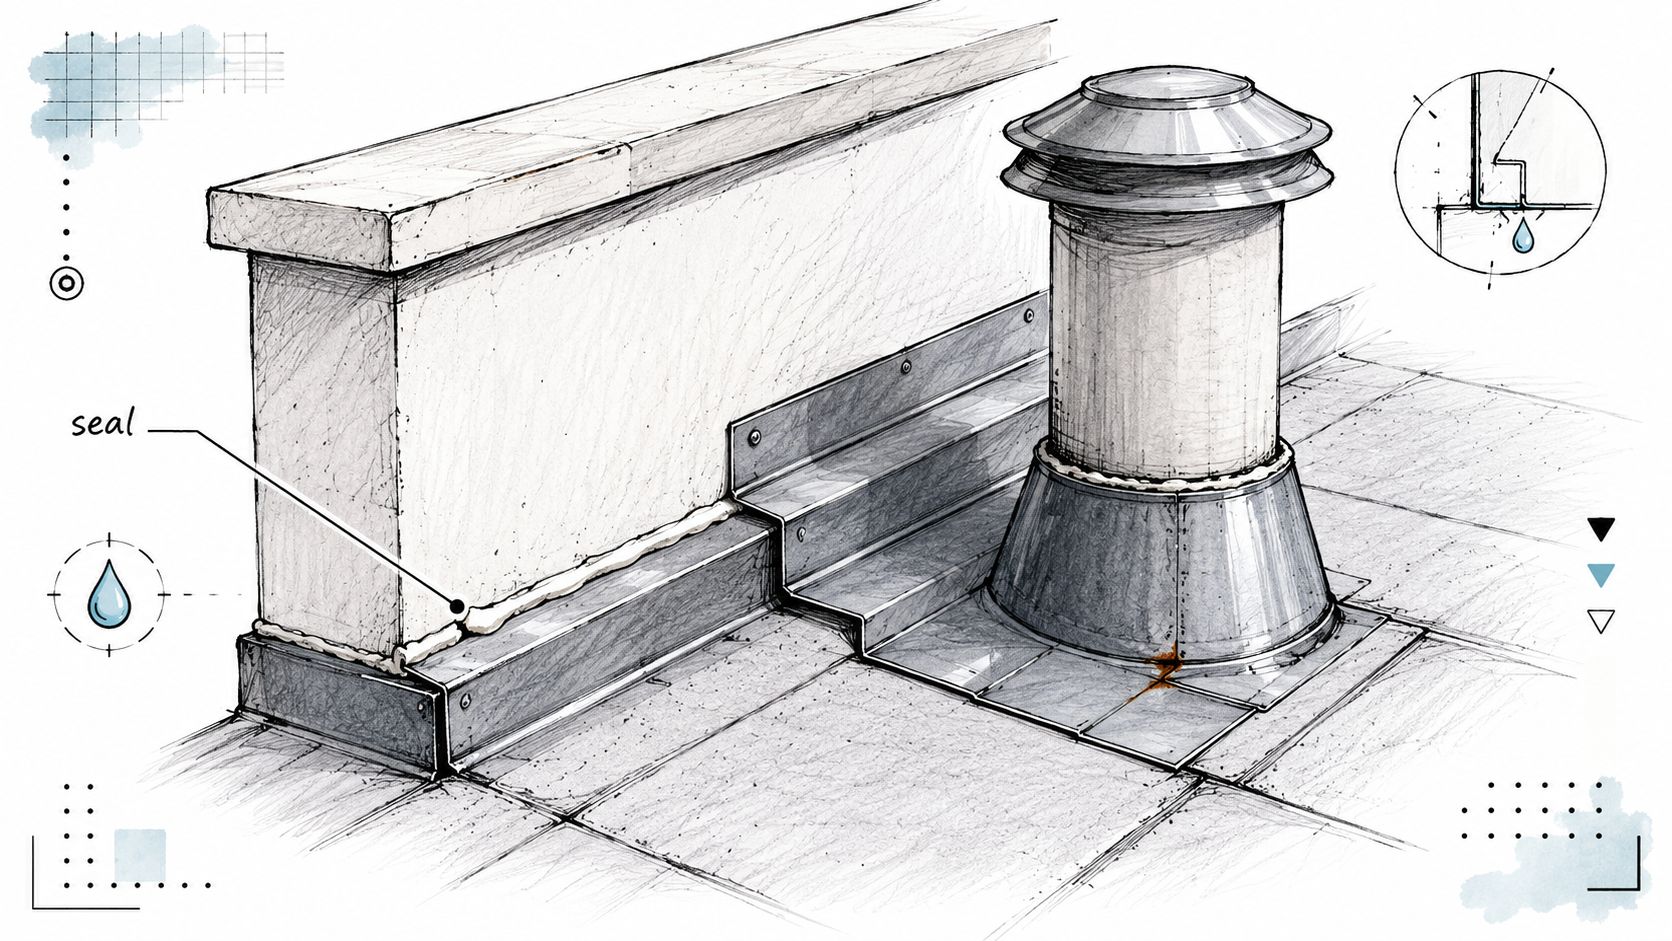
Common trouble spots around roof openings
Some penetration points get overlooked because they don’t look dramatic from a distance. The leak risk is still real.
- HVAC units and curbs: Check for cracked seals, loose metal, rust, or gaps where the unit meets the roof.
- Skylights and vents: Look for brittle sealant, lifted edges, and water staining nearby.
- Parapet and wall transitions: These areas often fail slowly, especially where old repairs were layered over earlier work.
- Termination bars and edge flashings: Loose fasteners or separated flashing can give wind-driven rain a way in.
A systematic checklist should map every penetration so inspections stay consistent over time. Industry guidance also treats flashing and penetrations as a core inspection category alongside membrane condition, drainage systems, seams, equipment, and interior moisture signs, as noted in this overview of the complete roofing inspection checklist and digital tool guide.
What doesn’t work is relying on caulk alone as a long-term fix. Sealant can help in the right repair, but repeated surface caulking over failed flashing usually buys time, not a real solution.
3. Gutter and Drainage System Evaluation
Water has to leave the roof quickly. If it doesn’t, everything else gets harder to manage.
Drainage problems are one of the most common reasons small roof issues turn into major ones. On commercial buildings, that means checking gutters, downspouts, drains, scuppers, and any low areas that hold water after rain. In Western Washington, this matters even more because roofs can stay wet for long stretches, especially through fall and winter.
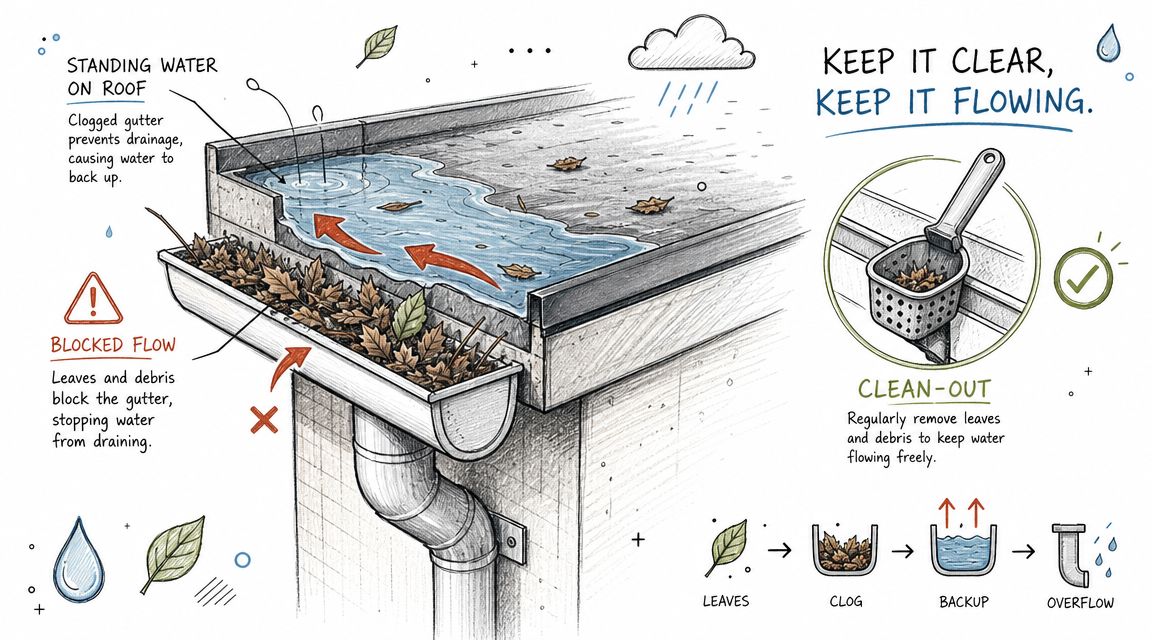
A good checklist should note whether drains are clear, whether water is reaching them properly, and whether debris is collecting in recurring trouble spots. Leaves, needles, and moss can build up fast on buildings near tall trees. That’s a familiar issue for properties in areas like Bellevue, Shoreline, and wooded parts of Snohomish County.
Signs drainage is becoming a roof problem
Drainage issues often leave clues before an interior leak appears.
- Standing water after rain: If water sits too long, roof materials wear faster and seams stay under stress.
- Clogged drains or gutters: Water backs up and starts looking for another path.
- Overflow staining on walls: Exterior streaking can point to blocked drainage above.
- Soft or discolored roof areas: These may suggest water has been lingering where it shouldn’t.
What works is treating drainage as a maintenance routine, not a once-a-year cleanup task. Properties with nearby trees or frequent roof debris usually need more regular attention than owners expect.
Water that can’t exit the roof will eventually test every seam, edge, and penetration around it.
4. Structural Sagging and Slope Deficiencies
Some roof problems aren’t surface-deep. A section that sags, dips, or no longer drains correctly can signal a more serious issue under the roofing material.
Owners often first notice this after a storm when one area keeps holding water while the rest of the roof dries out. On older commercial buildings, slope changes can happen gradually from age, previous moisture damage, or long-term deferred maintenance. The danger is that a small low spot can keep feeding bigger problems.
When sagging becomes a red flag
Not every uneven area means the structure is failing. But some findings should move beyond routine monitoring.
Recent guidance on commercial roof inspections highlights a key gap many checklists miss. Owners need to know which findings are repairable and which are structural warning signs. That’s especially important on low-slope roofs where seam separation, ponding, flashing issues, and punctures may seem minor at first but can lead to concealed moisture, wet insulation, or deck deterioration, as explained in this commercial roof inspection guide and checklist.
Escalation is usually warranted when the inspection finds:
- Structural deflection
- Rot or visible deck deterioration
- Delamination
- Repeated ponding even after drains are clear
A practical checklist should note where low spots appear, whether they’re growing, and whether interior signs line up beneath them. That helps separate a manageable drainage correction from a problem that needs engineering review.
5. Membrane Condition on Flat and Low-Slope Roofs
On many commercial buildings, the main roof is a membrane system. That can include TPO, EPDM, PVC, modified bitumen, or built-up roofing. These roofs don’t fail the same way a steep shingle roof does, so the inspection has to look for the right signs.
Seams, punctures, blisters, and old repair patches deserve close attention. A roof can look mostly intact from a distance and still have weak spots that let in moisture around a seam or penetration. That’s why a detailed commercial roof inspection checklist should review the roof as a connected assembly, not just a large flat surface.
What actually matters on membrane roofs
The most useful checklist entries are specific. “Damage near drain” is better than “worn area,” but “open seam at south drain with photo” is better still.
Current industry reporting also points to stronger adoption of standardized inspection and reporting systems. One estimate places the commercial roof inspection services market at about USD 0.44 billion in 2024 with projected growth to roughly USD 1.1 billion by 2033 at about a 10% CAGR. For property owners, the practical takeaway isn’t the market size itself. It’s that digital reporting, photo records, and repeatable inspection templates are becoming the standard for managing roofs across multiple assets.
For budgeting questions tied to repairs on these systems, this guide on commercial flat roof repair cost can help owners frame the next step.
Field note: Repaired areas deserve extra attention on every future inspection. A patch that keeps reappearing in reports is often pointing to a bigger issue nearby.
6. Fastener and Attachment Point Assessment
Fasteners rarely get attention until something starts moving, rattling, lifting, or leaking. But on a commercial roof, attachment points matter. They hold edge metal in place, secure metal panels, support mounted equipment, and help membrane systems resist wind and movement.
A loose or corroded fastener doesn’t always create an immediate leak. It often starts as a small opening that grows under repeated rain and wind exposure. Buildings near the water in places like Burien or Shoreline can also see faster wear on exposed metal parts because of the damp coastal environment.
Where attachment failures tend to show up
A strong inspection doesn’t need to remove the whole roof to catch warning signs. It should sample and document the areas most likely to fail first.
- Perimeter and edge zones: Wind pressure is often stronger at exposed edges.
- Metal panel fasteners: Look for backing out, rust, or failed washers.
- Flashing terminations: Missing or loose fasteners can weaken the whole detail.
- Equipment mounts: Rooftop units and accessory hardware should stay secure and sealed.
What works is checking patterns, not just isolated screws or clips. If a cluster of fasteners shows corrosion or movement, it’s usually smarter to investigate the wider area than to tighten one or two and move on.
What doesn’t work is assuming the roof is fine because the visible field looks clean. Many leak paths begin at the roof’s smaller connection points.
7. Moss, Algae, and Biological Growth Management
In Western Washington, this issue is familiar. Moss, algae, and lichen don’t always look urgent, but they can hold moisture against the roof and speed up wear over time.
This is especially common on shaded roof areas and buildings under mature trees. A property manager in Seattle or Snohomish County may notice green buildup first on one side of the building, then gradually across wider sections. Left alone, that growth can interfere with drainage, hide surface damage, and make routine roof checks less reliable.
A practical approach to growth on the roof
Biological growth should be documented as part of the inspection, not treated as a cosmetic side note.
- Map where growth is concentrated: Repeating growth in the same area may point to drainage or shade problems.
- Connect it to tree cover: Overhanging branches often keep the roof damp longer.
- Avoid aggressive cleaning methods: Pressure washing can damage roofing materials.
- Plan prevention as well as removal: Cleaning alone doesn’t solve the conditions that let growth return.
For owners dealing with recurring buildup, this guide on the best way to kill moss on roof explains safe next steps.
A useful checklist should also note whether growth is affecting drains, seams, or surface visibility. On commercial properties, moss is rarely just an appearance issue. It can make it harder to spot a roofing problem underneath.
8. Weather Damage and Storm Impact Assessment
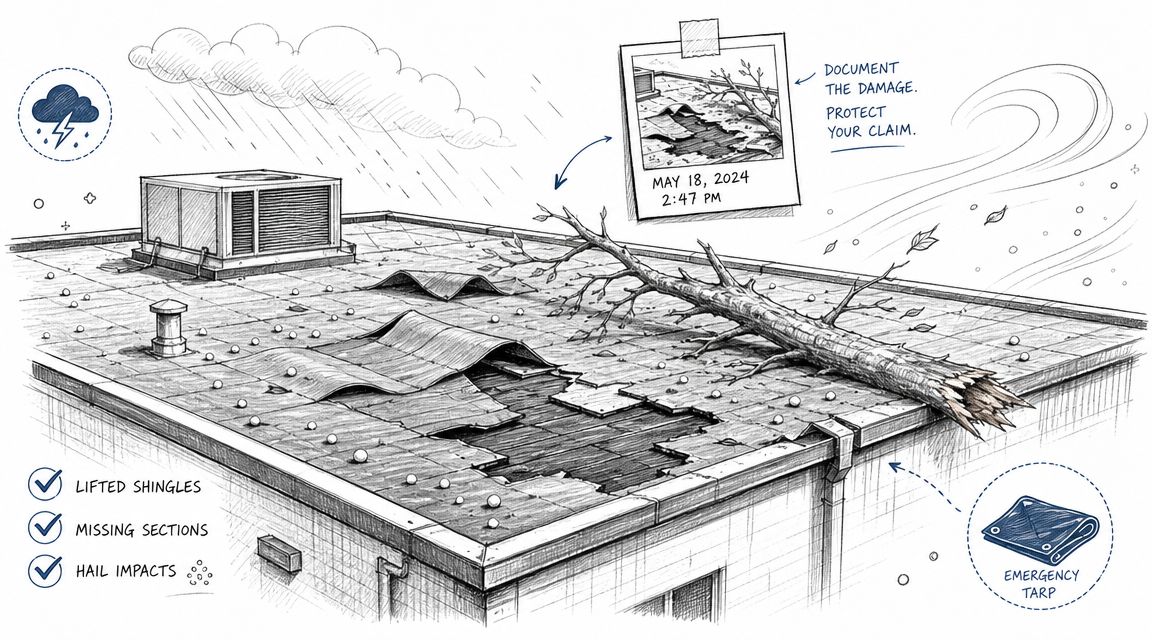
A windstorm hits overnight. The building looks fine from the ground the next morning, but one lifted edge, one puncture from branch debris, or one backed-up drain can turn into an active leak during the next long stretch of rain.
That pattern is common in Western Washington. Storm damage here is not always dramatic. Often it is small damage that stays hidden until steady rain keeps feeding it. For property managers, the true cost is not just the roof repair. It is tenant disruption, wet insulation, interior cleanup, and the rush pricing that comes with emergency work.
Post-storm inspections need to happen quickly and with a clear purpose. The goal is to find new damage, separate urgent repairs from items that can be scheduled, and create a record that supports maintenance decisions and insurance conversations if needed.
What to document right after a storm
Storm notes should be specific enough that someone reviewing them later can tell what changed, where it happened, and how serious it is.
- Photograph impact areas clearly: Capture lifted materials, punctures, displaced flashing, debris strikes, and blocked drains from multiple angles.
- Mark roof zones and affected elevations: Large commercial roofs are easier to manage when damage is tied to a specific area instead of a general description.
- Record the storm timing and site conditions: Note when the event occurred, when the inspection happened, and whether standing water, saturated areas, or loose debris were present.
- Check the interior the same day: Look for ceiling stains, wet insulation, drip marks near penetrations, and moisture around mechanical units.
- Set repair priority levels: Active leaks, exposed seams, and damaged edge details need immediate attention. Minor scuffs or limited debris impact can go on a watch list.
This is also where experience matters. I have seen owners focus on the obvious branch strike and miss the smaller wind damage at corners, parapet edges, and around rooftop equipment. Those are the trouble spots that often lead to repeat leak calls weeks later.
A good storm assessment should leave you with an action plan, not just a folder of photos. You should know what needs same-day repair, what can wait for a scheduled crew, and what should be rechecked after the next heavy rain so you can protect the building and control costs.
8-Point Commercial Roof Inspection Comparison
| Inspection Item | Implementation complexity | Resource requirements | Expected outcomes | Ideal use cases | Key advantages |
|---|---|---|---|---|---|
| Shingle and Surface Material Condition Assessment | Low–Medium, visual expertise required | Visual inspection, photography, material ID | Remaining life estimate; surface defects and repair needs | Annual checks, pre-sale, insurance reviews | Early detection, budget planning, insurance documentation |
| Flashing and Penetration Integrity | Medium, detailed transition inspections | Close access to penetrations, sealant tools, rain checks | Locate leak sources; recommend seal/replace actions | Buildings with many penetrations or recurring leaks | Prevents interior damage; cost-effective targeted repairs |
| Gutter and Drainage System Evaluation | Low–Medium, procedural but frequent | Ladders, cleaning tools, flow/slope checks | Restored drainage; reduced pooling and overflow | Rainy climates; flat roofs; properties near trees | Protects foundation and membrane; reduces moss and ice dam risk |
| Structural Sagging and Slope Deficiencies | High, may require measurements/engineer | Measurement tools, interior access, structural review | Identify structural compromise; remediation plan | Older buildings, post-snow/storm, visible deflection | Prevents catastrophic failure; safety and code compliance |
| Membrane Condition on Flat and Low-Slope Roofs | Medium–High, material‑specific skills | Membrane probes, seam inspection, optional electrical testing | Detect seam failures, punctures; repair vs replace guidance | Single-ply or built-up flat roofs | Preserves primary weather barrier; supports warranties |
| Fastener and Attachment Point Assessment | Medium, systematic sampling needed | Grid sampling, torque tools, corrosion checks | Identify loose/corroded fasteners; wind-uplift risks | Metal roofs, exposed buildings, roof‑mounted equipment | Relatively low‑cost fixes; prevents system separation |
| Moss, Algae, and Biological Growth Management | Low, ongoing maintenance focus | Inspection, gentle cleaning, chemical treatments, pruning | Reduced biological coverage; slower material decay | Shaded, wet climates (e.g., Pacific Northwest) | Extends roof life; improves appearance; prevents clogging |
| Weather Damage and Storm Impact Assessment | Medium, time-sensitive and documentation heavy | Photography, emergency tarping, adjuster reports | Documented damage for claims; prioritized repairs | Immediately after storms, hail, wind, falling debris | Supports insurance claims; prevents secondary interior damage |
Turn Your Inspection Findings into an Action Plan
Going through a commercial roof inspection checklist only helps if the findings lead to action. Photos and notes are the starting point. The actual value comes from deciding what needs immediate repair, what belongs on a scheduled maintenance list, and what should go into longer-term budget planning.
For most owners, the hardest part isn't spotting that something looks off. It's knowing what that means for the property. A clogged drain may call for prompt maintenance. A recurring seam issue may justify more detailed repair planning. Structural deflection, ongoing ponding, or repeated leaks in the same area should push the conversation beyond patching and into deeper review.
That's where organized documentation matters. The checklist should record the roof area, visible condition, interior signs if present, and supporting photos. Over time, that history helps owners compare season to season and make better decisions about spending. It also creates a clearer record when the roof has been exposed to severe weather or when multiple vendors have been on the roof.
For owners dealing with recent storm-related issues, this resource on commercial storm damage claim help may help with the documentation side of the process.
A practical action plan usually falls into three buckets:
- Immediate response: Active leaks, displaced materials, major flashing failure, or signs of structural concern
- Scheduled maintenance: Drain cleaning, sealant touch-ups where appropriate, moss treatment, and minor repairs
- Capital planning: Widespread membrane wear, repeated patching in the same zones, aging materials, or conditions that keep returning despite maintenance
In Western Washington, the climate adds urgency to small roof issues. Long rainy periods don't give roofs much recovery time. If a weak point is already there, more moisture usually finds it. That's why waiting for a bigger interior problem rarely saves money. It often just shifts the cost from controlled repair to disruption, cleanup, and possible damage inside the building.
At Four Seasons Roofing, the certified team handles this type of issue across the Seattle area and broader Western Washington region. For homeowners, property managers, and commercial owners trying to understand what a roof inspection is really showing, clear documentation and straightforward recommendations make the next step easier. The goal isn't to overcomplicate the process. It's to turn roof observations into decisions that protect the property.
Frequently asked questions
How often should a commercial roof be inspected?
Industry guidance commonly recommends inspections at least twice a year, typically in spring and fall. It also makes sense to inspect after severe weather or anytime contractors or vendors have accessed the roof.
What should be included in a commercial roof inspection checklist?
A strong checklist covers the roof surface or membrane, drainage, flashing, penetrations, roof edges, seams and fasteners, rooftop equipment, and interior signs of moisture. It should also document inspection date, weather conditions, findings by area, and photos.
Can a property manager do a commercial roof inspection?
A property manager can often handle basic visual checks from safe access points and document signs of trouble. A roofing professional should step in when there are active leaks, safety concerns, repeated problem areas, or signs of structural movement.
What are the biggest red flags on a flat or low-slope roof?
Repeated ponding, seam separation, deteriorated flashing, punctures, and interior moisture signs are all important. Structural deflection, rot, or repeated water problems even after drains are clear deserve urgent professional review.
Does moss on a commercial roof always mean replacement?
Not always. Moss usually means the roof needs cleaning, better maintenance, and a closer look at moisture and drainage conditions. If the growth has been there a long time, a professional inspection can confirm whether the roof surface underneath is still sound.
How does Four Seasons Roofing help with roof inspections in Western Washington?
Four Seasons Roofing provides roof inspections, repair guidance, and maintenance support for Western Washington properties. Their team works with common local issues like prolonged rain exposure, moss growth, storm damage, and aging roofing materials.
Suggested internal link opportunities
- roof leak repair services
- emergency roof repair
- roof inspection in Western Washington
- moss removal and roof maintenance
- roof replacement signs
If a leak, stain, or drainage issue has raised questions about your roof, Four Seasons Roofing can help you take the next step with a clear commercial roof inspection checklist and practical guidance for your Western Washington property.